
Info
This post is a part of a bigger project. You can read about it all here:
This is a follow-up to my earlier post about controlling IKEA Idasen standing desk from a Raspberry Pi. While it works as it is, it’s not really feasible to SSH into the Pi and issue commands each time I want to raise it up or down, so I’ll setup a macro keyboard with dedicated keys for that 😄. A bit like Elgato Stream Deck, but for a lot cheaper.
One size does not fit all
There are already few projects out there that are worth mentioning, but I’m not going to use them and here’s why:
| Project | Why it’s not for me |
|---|---|
| davidz-yt/desk-controller | There’s a YouTube video showcasing his setup in detail. It’s quite complicated for what it is - just a macro keyboard - and relies on several parts. A Pi computer, a HID remapper (another project) and a main PC to handle the automation. This can be done a lot simpler - with just the Pi and without a Windows PC. |
| jakkra/Gesture-Detecting-Macro-Keyboard | While it’s very cool and well thought-out, I don’t want to deal with programming microcontrollers and assembling custom hardware. I feel like once you put something like this together, it’s a done deal. It’s harder to continuously improve, jump in and out, modify and add new features when needed, or when an idea strikes. |
The solution I chose
Scouring the Internet and looking at all the options gave me a good sense of how I want to approach this. I’m going to merge and improve upon different solutions I saw. Main goals being:
- Minimal setup, with as little parts as possible. Hardware costs money, software can be made for free.
- Reliable and simple from software standpoint as well. I don’t want to use multiple different apps or services with multiple points of failure. I should be able to forget how it even works (although thanks to this post I’ll be able to recall).
- Easily modifiable, allowing me to change, add or expand functions over time. I want to see and configure them all in a single text file.
- Self-contained, not dependant on the power status or connectivity of other devices for basic operation.
As with any automation task, it’s very disappointing when you can’t rely on it 100% of the time. I don’t want to think “Will it work this time?” when I press the button.
Hardware
There are only two components needed: a computer running Linux and a spare keyboard. Something similar can be done in Windows too, but it’s more hassle and goes against the principles I outlined above. I don’t want to babysit it.
You could use your main PC, but an independent machine is going to work better for this. It can be a home server, an old laptop, an SBC like Raspberry Pi. As long as it runs some form of Linux, and can keep running 24/7 to handle automation tasks, it will do.
Also, you can use any keyboard. Actually, any type of HID (Human Interface Device), even a joystick or a mouse (programmable gestures, sounds interesting?), although that would require some changes to the Python script. Maybe I’ll cover it another day. Let’s stick to keyboards this time.
I’m using one like this:
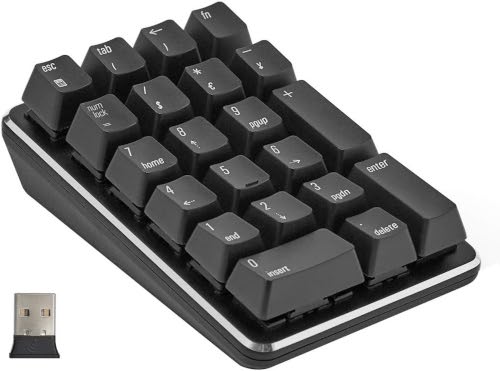
2.4Ghz wireless numeric keypad with mechanical switches. 2.4Ghz is more reliable than Bluetooth, doesn’t require any pairing or setup, and wakes up faster from sleep. Mechanical switches allow me to swap the keycaps for transparent ones, so I can print custom labels:

Software
I had so much fun with ASCII diagrams in earlier posts, so here’s another one 😆.
I’ll use a Python script to grab that specific keyboard based on its event handler, so it cannot be used as an input device in other apps. At that point the keyboard will be dedicated to a single process. The script will then monitor for key presses and do stuff that’s programmed for standard key codes. I could still connect a 2nd keyboard and use it as normal, not interfering with this setup.
I think this works best. The alternatives would be to program a special keyboard for sending non-standard key codes, to ensure it doesn’t interfere with normal input devices. Or scrap the idea of a macro keyboard entirely and sacrifice functionality on all input devices by dedicating certain combinations like SHIFT + ALT + 1 to this automation. That’s no fun.
I snatched this concept from a Reddit user u/TimeLoad in his post. Another user, u/kozec, provided a Python script in the comments, which was then used by the OP to iterate on the idea. I had to fix few typos and indentation issues, but it is solid regardless, so now I’m building upon it further. A cute little example of the magic of open source and collective effort.
How to set it up
This whole setup is easier to do over SSH, but it can also be done locally with two keyboards connected. One dedicated for macros, and another one that you can use for typing in the terminal.
Identify the keyboard
First we need to identify the device ID of the keyboard we want to dedicate for macros. We can do that with:
cat /proc/bus/input/devices
Look for entries where H: Handlers= starts with sysrq and contains kbd:
I: Bus=0003 Vendor=062a Product=4101 Version=0110
N: Name="MOSART Semi. 2.4G Keyboard Mouse"
P: Phys=usb-3f980000.usb-1.2/input0
S: Sysfs=/devices/platform/soc/3f980000.usb/usb1/1-1/1-1.2/1-1.2:1.0/0003:062A:4101.0001/input/input0
U: Uniq=
H: Handlers=sysrq kbd leds event0
B: PROP=0
B: EV=120013
B: KEY=1000000000007 ff9f207ac14057ff febeffdfffefffff fffffffffffffffe
B: MSC=10
B: LED=7
In this example, it’s followed by event0 and its Name corresponds to the device I want to use as a macro keyboard (though it claims to also be a mouse, interesting). event0 is what I need to reference it later.
Tip
This is not necessary on Raspberry Pi OS with the default account, but on other systems you may need to add yourself to the relevant access group for event handlers before proceeding. First, check which group controls the access by running ls -l /dev/input:
luk@officepi:/opt/deck $ ls -l /dev/input
total 0
drwxr-xr-x 2 root root     120 Oct  8 11:41 by-id
drwxr-xr-x 2 root root     140 Oct  8 11:41 by-path
crw-rw---- 1 root input 13, 64 Oct  8 11:41 event0
crw-rw---- 1 root input 13, 65 Oct  8 11:41 event1
crw-rw---- 1 root input 13, 66 Oct  8 11:41 event2
crw-rw---- 1 root input 13, 67 Oct  8 11:41 event3
crw-rw---- 1 root input 13, 68 Oct  8 11:41 event4
crw-rw---- 1 root input 13, 69 Oct  8 11:41 event5
crw-rw---- 1 root input 13, 63 Oct  8 11:41 mice
crw-rw---- 1 root input 13, 32 Oct  8 11:41 mouse0
On this system it’s the input group, so you would need to add yourself to it with:
sudo usermod -a -G input $USER
Then log out and log back in to apply the change.
Setup Python
Install python3 and python3-evdev packages:
sudo apt install python3 python3-evdev
Test the keyboard
Use this python script to test. Make sure to enter correct event handler on the 2nd line, the one that was captured earlier:
import evdev
device = evdev.InputDevice('/dev/input/event0')
device.grab()

for event in device.read_loop():
        print(event)
Save it as grab-keyboard.py for example and then execute from terminal with python grab-keyboard.py.
Now start pressing keys on the macro keyboard and you should see events being captured:
luk@officepi:~/deck $ python grab-keyboard.py
event at 1696493346.698687, code 04, type 04, val 458840
event at 1696493346.698687, code 96, type 01, val 01
event at 1696493346.698687, code 00, type 00, val 00
event at 1696493346.763680, code 04, type 04, val 458840
event at 1696493346.763680, code 96, type 01, val 00
event at 1696493346.763680, code 00, type 00, val 00
You can stop script execution by pressing CTRL+C on the main keyboard (or in SSH session).
Main course
We want to be able to act when specific keys are pressed. First, we need to know what are the possible key codes. This can be checked by:
less /usr/include/linux/input-event-codes.h
This file defines input event codes recognized by the kernel. Some common examples are: KEY_ENTER (28), KEY_SPACE (57), KEY_ESC (1). For a keypad like the one I’m using, the key codes are: KEY_KP0 (82) to KEY_KP9 (73). There’s also KEY_KPDOT (83), KEY_KPPLUS (78) and so on.
Tip
If you can’t find the key you are looking for, you can use the test script above to print its event code to the console, then define it in the file yourself if it’s not already there. This may be useful for keyboards with custom keys or for remapping media control keys etc.
Armed with that knowledge, we can now capture the key presses and execute commands with this Python code. Again, remember to set correct event handler for your macro keyboard (for me that’s event0 in dev = InputDevice('/dev/input/event0')), and define the key you want to monitor on the 2nd line from the bottom. Here I’m using KEY_KP0:
import os
from evdev import InputDevice, categorize, ecodes
dev = InputDevice('/dev/input/event0')
dev.grab()

for event in dev.read_loop():
  if event.type == ecodes.EV_KEY:
    key = categorize(event)
    if key.keystate == key.key_down:
      # Repeat two lines below to add more keys and actions
      if key.keycode == 'KEY_KP0':
        os.system('echo Hello World')
My final working example to control IKEA Idasen desk, which is what triggered me to start this whole project:
import os
from evdev import InputDevice, categorize, ecodes
dev = InputDevice('/dev/input/event0')
dev.grab()

for event in dev.read_loop():
  if event.type == ecodes.EV_KEY:
    key = categorize(event)
    if key.keystate == key.key_down:
      # Repeat two lines below to add more keys and actions
      if key.keycode == 'KEY_KP0':
        os.system('echo Hello World')
      if key.keycode == 'KEY_KP2':
        os.system('echo Moving desk to sit position')
        os.system('idasen-controller --move-to sit')
      if key.keycode == 'KEY_KP3':
        os.system('echo Moving desk to stand position')
        os.system('idasen-controller --move-to stand')
Dessert: Autostart as systemd service
It’s a bit tedious having to run the Python script manually to monitor for key presses. We can setup a systemd service to control it more efficiently and also autostart on every boot.
Dedicated service account
I like to run things like that under a dedicated service account, so I’ll set it up first and name it deck:
sudo adduser --system --home /opt/deck --shell /bin/false --disabled-login --disabled-password --group deck
Now add yourself to deck group:
sudo usermod -a -G deck $USER
Info
You need to log out and log back in (or start new SSH session) for group membership changes to take effect.
Change permissions on deck home directory:
sudo chmod -R 771 /opt/deck
You also need to grant deck user access to input devices. First, check which group controls the access by running ls -l /dev/input:
luk@officepi:/opt/deck $ ls -l /dev/input
total 0
drwxr-xr-x 2 root root     120 Oct  8 11:41 by-id
drwxr-xr-x 2 root root     140 Oct  8 11:41 by-path
crw-rw---- 1 root input 13, 64 Oct  8 11:41 event0
crw-rw---- 1 root input 13, 65 Oct  8 11:41 event1
crw-rw---- 1 root input 13, 66 Oct  8 11:41 event2
crw-rw---- 1 root input 13, 67 Oct  8 11:41 event3
crw-rw---- 1 root input 13, 68 Oct  8 11:41 event4
crw-rw---- 1 root input 13, 69 Oct  8 11:41 event5
crw-rw---- 1 root input 13, 63 Oct  8 11:41 mice
crw-rw---- 1 root input 13, 32 Oct  8 11:41 mouse0
On this system (Rapsberry Pi OS x64 Lite), it’s input group, so I need to add my deck user to it with:
sudo usermod -a -G input deck
When specific keys are detected, I plan on executing idasen-controller script that I covered in an earlier post. This script will be executed by deck user as well now, so I also need to copy idasen-controller config file from my own home directory to the home directory of deck user. If you are following me along, then that’s /opt/deck.
mkdir -p /opt/deck/.config/idasen-controller && cp ~/.config/idasen-controller/config.yaml "$_"
Systemd unit file
Now save the final Python script we worked on earlier in /opt/deck directory. I’ll name mine deck.py.
Next step is to create systemd unit file. Here’s a template. Make sure to set correct username and group (deck in my example) and location of the script (/opt/deck/deck.py).
[Unit]
Description=DYI Macro Keyboard

[Service]
User=deck
Group=deck
Type=simple
Restart=on-failure
RestartSec=5s

ExecStart=/usr/bin/python3 /opt/deck/deck.py

[Install]
WantedBy=multi-user.target
Save it as deck.service in /etc/systemd/system directory, then reload daemons with:
sudo systemctl daemon-reload
We can start the service now and enable it to start automatically on boot with one command:
sudo systemctl enable deck.service --now
If you make any changes to the script from now on, remember to restart the service to apply them:
sudo systemctl restart deck.service
This is all coming together pretty nicely and I will definitely expand it further.
I still have 18 keys left unused. Stay tuned for Home Assistant integration to control smart home devices with that macro keyboard 🙂.